Guide
How to work in the teacher dashboard
Preparing a course, running a class and final grades — in plain words, with screenshots. There is no password: sign in with your Google account or with an email code. Code emails sometimes land in Spam.
The screenshots show the dashboard in Russian; in the dashboard itself, switch the language to English with the selector at the top.
Quick start
The first time, go through these in order. Each step is explained in more detail below.
- Sign up: «Dashboard» → «Create an account (Free)» → the Google button (no code needed) or your name and email → the code from the email.
- Create a class on the Courses tab.
- Upload the student list on the Students tab: the group number and the names in a column.
- For those not yet in TBLdesk, upload their emails in a column. For those already in TBLdesk, the QR code is enough.
- Import questions as text in the dashboard (Format → Import).
- Show students the QR code or link from the Tests tab.
- In class: individual test → team test → team tasks → (essay) → gradebook.
Sign-up and sign-in
To start, open the dashboard: tbl.edservice.kz/teacher (the «Dashboard» button on the website).
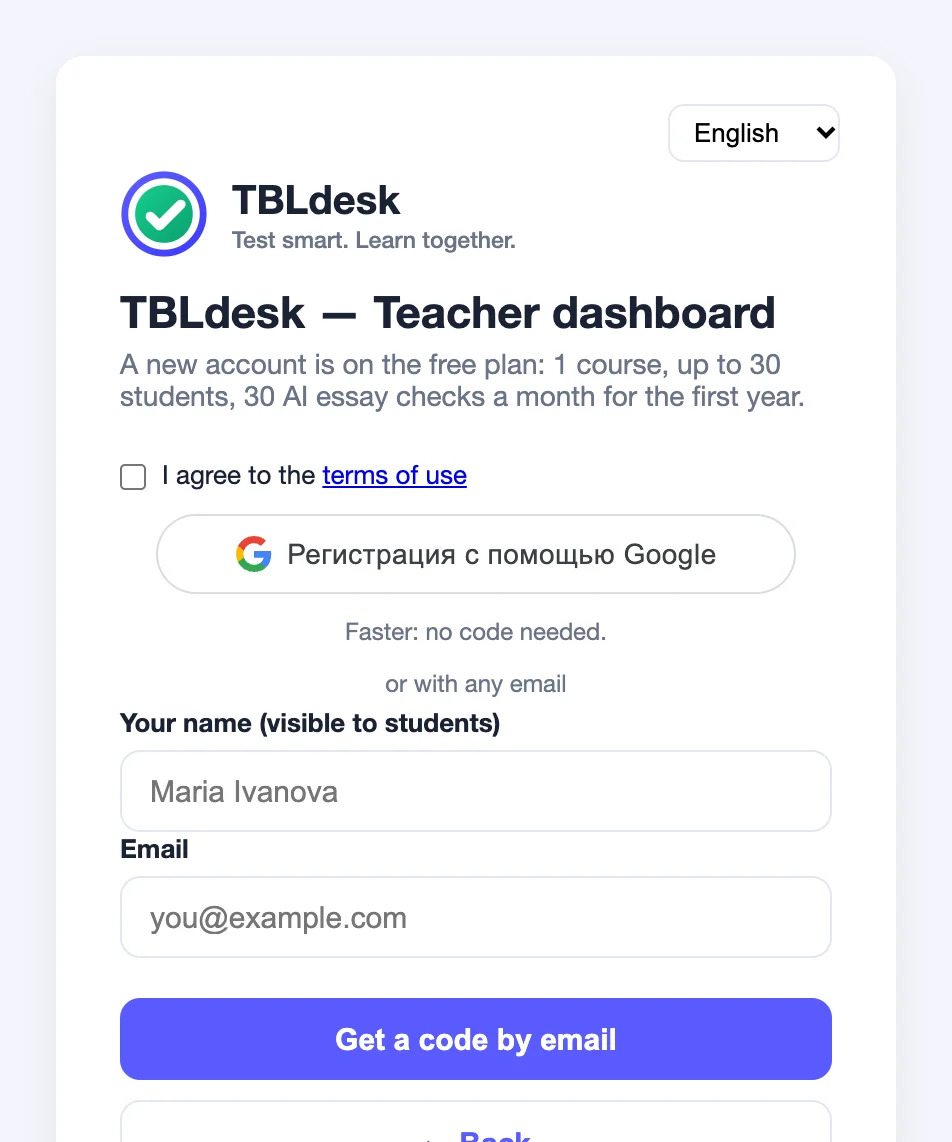
How to create an account
- Open «Dashboard» → «Create an account (Free)» and tick the agreement to the terms of use.
- With Google (faster): press the Google button and pick your email. Check your name (students will see it), tick the agreement to the terms → «Create an account». No email code needed.
- With an email code: «Create an account (Free)» → your name and email → «Get a code by email» → the code from the email + agreement to the terms → «Create an account».
- You go straight into the dashboard. The default plan is Free.
Regular sign-in
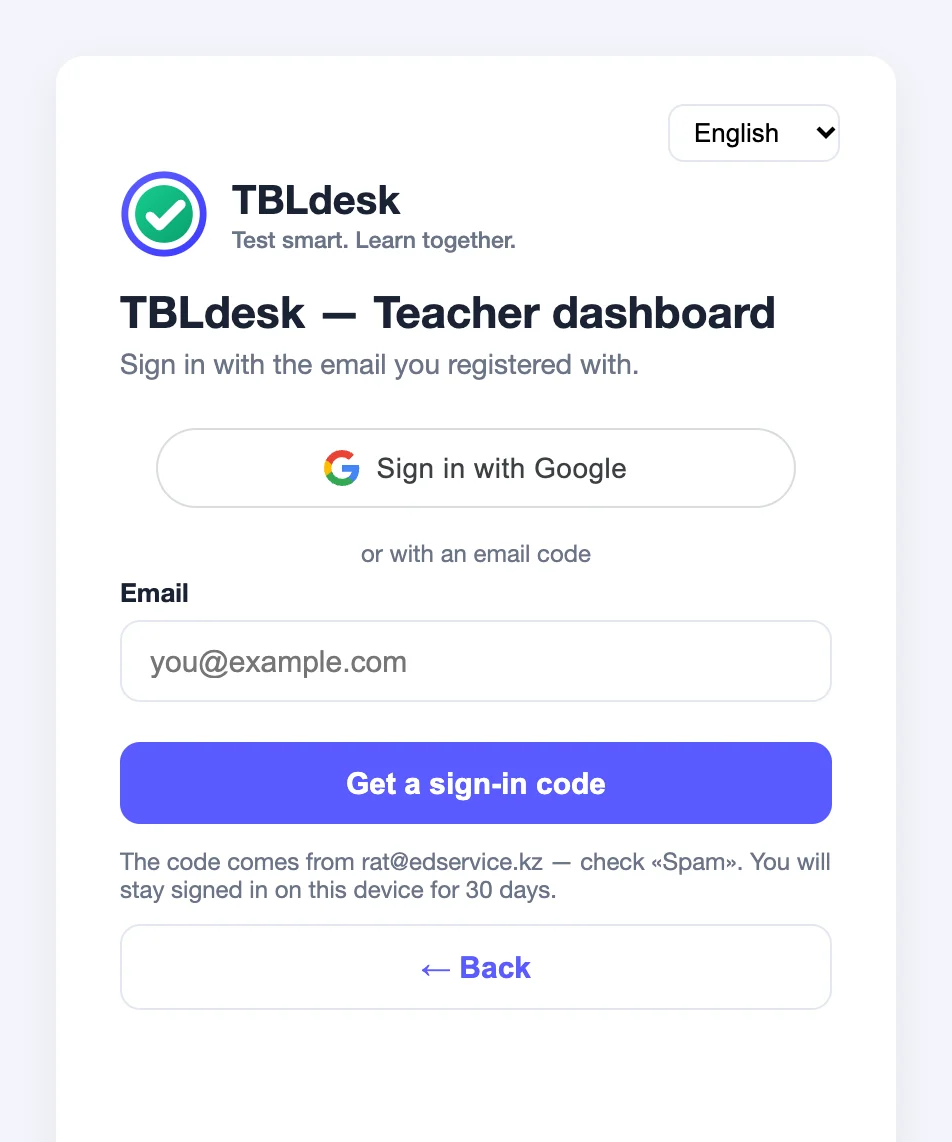
There is no password. You stay signed in on this device for 30 days. You can sign in with Google using the email the account is registered with. On a shared computer (classroom, library) work in an incognito window and press «Sign out» at the end: if your Google stays open in the browser, the Google button signs in without a code.
Free plan: 1 base course, up to 30 students, 1 language. Unlimited sessions within the course. 30 AI essay checks per month during the first year; tests, tasks and the gradebook have no time limit.
Courses and questions
A base course is a subject with one roster. A session is a specific class with its questions.
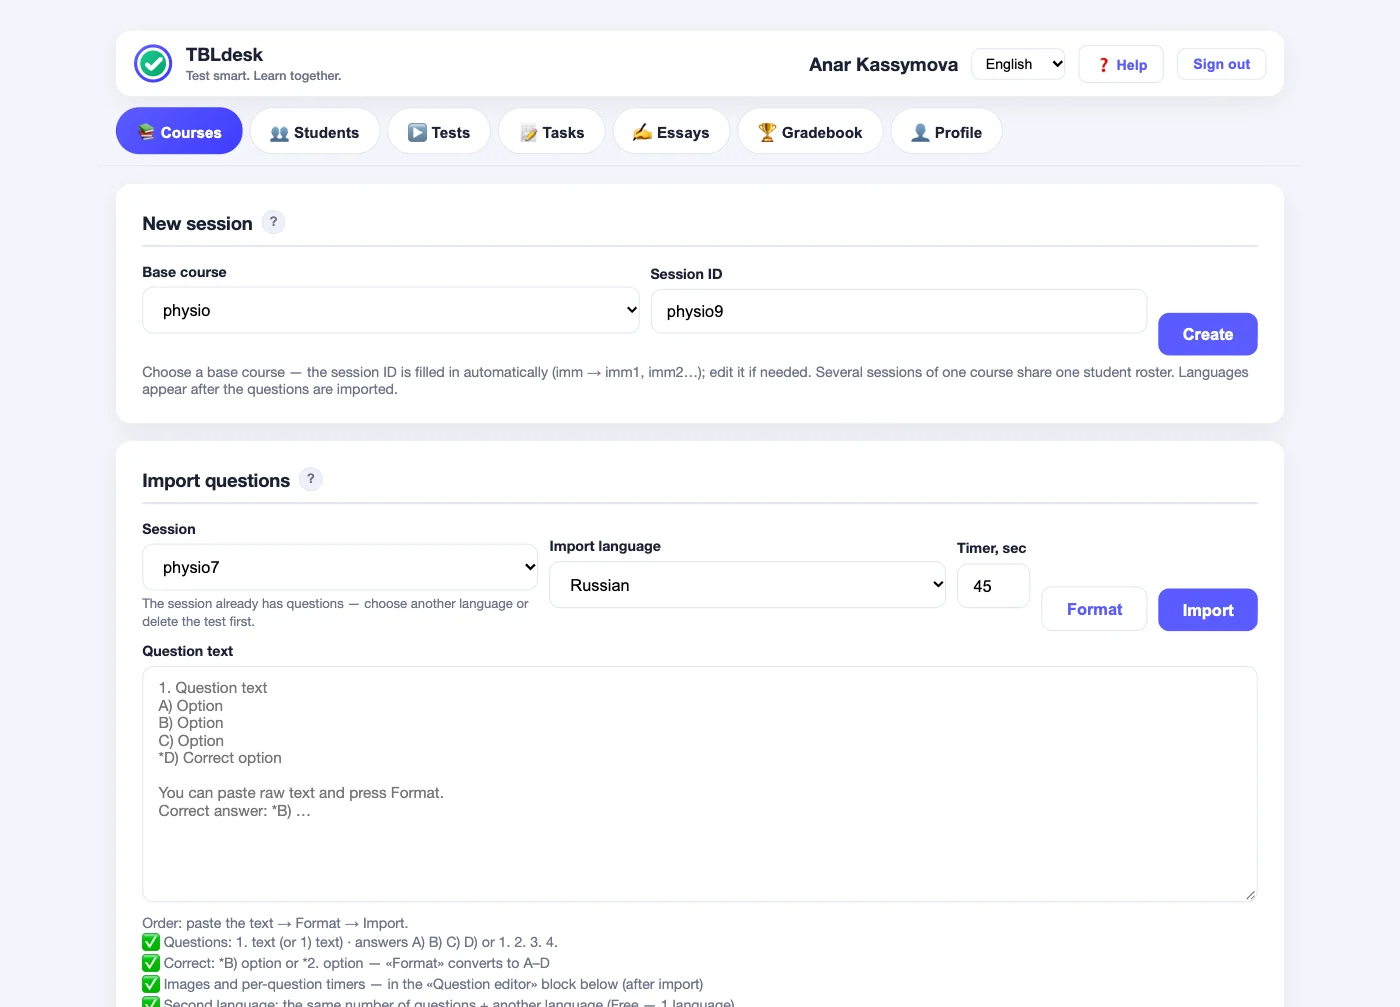
Create a class
- Choose a base course (or create a new one).
- Check the session ID — it is filled in automatically, you can edit it.
- «Create». Languages appear after the questions are imported.
Upload questions
- Choose the session, import language and timer.
- Paste the text → «Format» → «Import».
- In the «Question editor», choose a language and click a question — the editor window: text, answers, timer, image.
*B) …. Free — one language. No Google Doc needed.
Students
The student list from your roster. Permanent teams for TBL. Registration via QR.
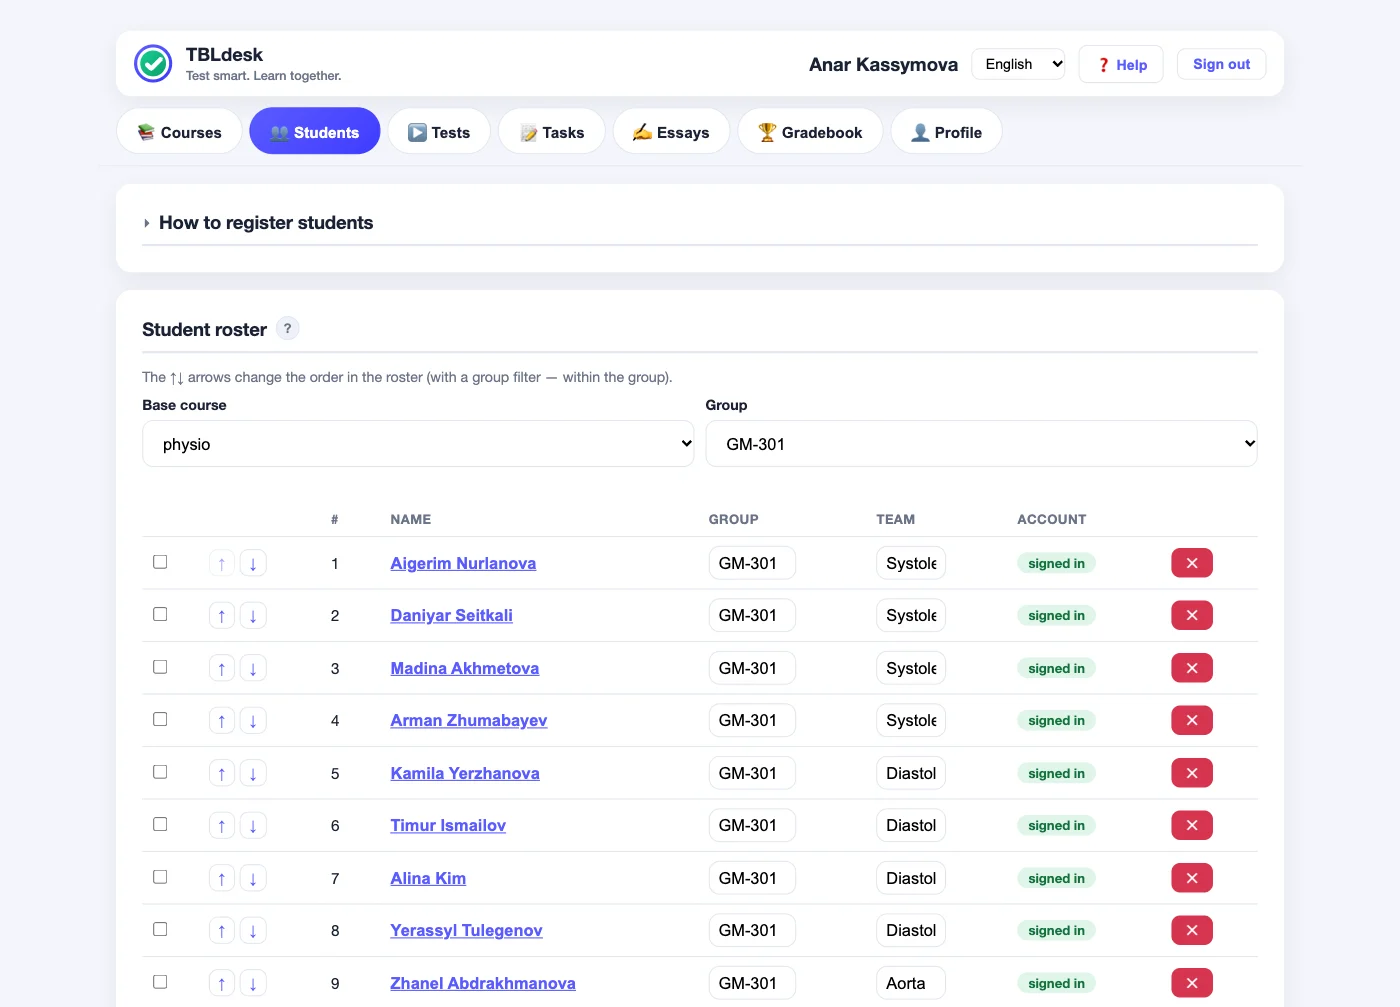
- Create a session — the base course appears in the lists.
- Import the roster: the group number and the names in a column (email is optional).
- Upload students' emails in a column in «Upload emails». For a single student — click their name and type the email from their phone screen. Gmail addresses are best: with them, students sign in with the Google button, without an email code. Many students have a Google account even if they do not use Gmail for mail. If you have the class in Google Classroom, export its grades to Google Sheets (in an assignment: ⚙ → copy grades to Sheets), copy only the email column and paste it into «Upload emails». Names from Classroom are not needed: on first sign-in the student picks themselves in the roster.
- The student opens your QR (Tests tab) and presses «Sign in with Google» — the Gmail on your list. An email code also works. If the email is already in the roster, they see the course right away; if it is only on the email list, they pick their name.
- No email arrives or the student cannot find themselves — click their name in the roster: compare the email and, if needed, use «Sign-in code» (the student presses «I was given a code»). Show the code on your screen, not on the projector.
- Assign teams for the team test and team tasks.
| Status | What it means |
|---|---|
| no email | No email in the roster — the total will be empty |
| not registered | The email is there, but the student has not signed in yet |
| signed in | The student has signed in to TBLdesk |
Tests in class
IRAT — each student alone. GRAT — one member answers for the team, the score goes to everyone. Proctoring: 1st violation — a warning, 2nd — minus 1 point, 3rd — the test is submitted automatically (in IRAT the score is halved). Proctoring sees only the screen of the student's device. It will not notice a second phone or notes, so run tests in a supervised classroom, not remotely and not in a large cohort.
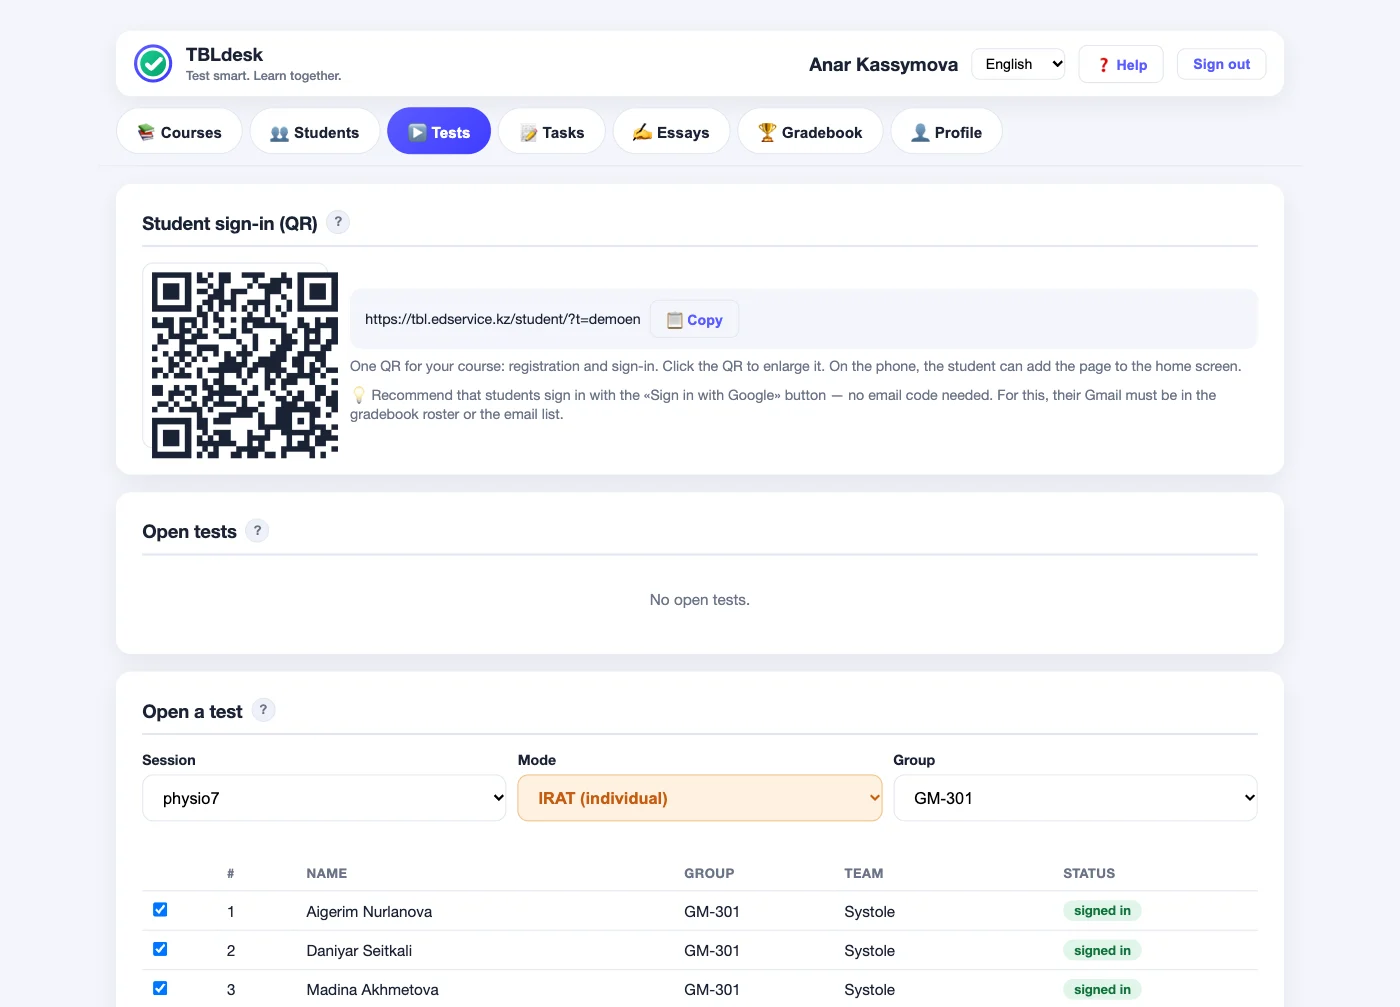
How to open a test
- Session and mode: IRAT or GRAT.
- Group → choose who to assign it to.
- IRAT — usually everyone. GRAT — one per team.
- «Open for selected».
- «Progress» — who has finished / is writing / has not started.
- Internet drop: the student refreshes the page → «Continue» (IRAT within 20 minutes of the start, GRAT within 5 minutes).
- Later — a second attempt, if the test is still open. After a successful submission there is no retake.
- Another device — only with your permission. The student cannot continue the attempt or start a second one on another phone or computer until you press «Allow another device» in «Progress» (it shows «⚠ asks for another device»). Allow it only if the student is next to you (a dead phone). This way the test cannot be handed to someone outside the room.
- «⚠ 3 devices» in the results — the student has 3 or more different devices across all your classes (usually 1–2). The list is in their log (🔍).
Violation log: how to read it
The system records every violation and glitch: when it happened, how many seconds the student was off the page, and on which device. This lets you tell cheating from a screen that went dark or a general Wi-Fi glitch — without questioning anyone.
Where to look
- The «Tests» tab → «Test results» → choose the session and group.
- Above the table — a group summary and the «Group log» button.
- The «Viol.» column shows the student’s violations in the test and 🔍: click it to open this student’s log (test and essay).
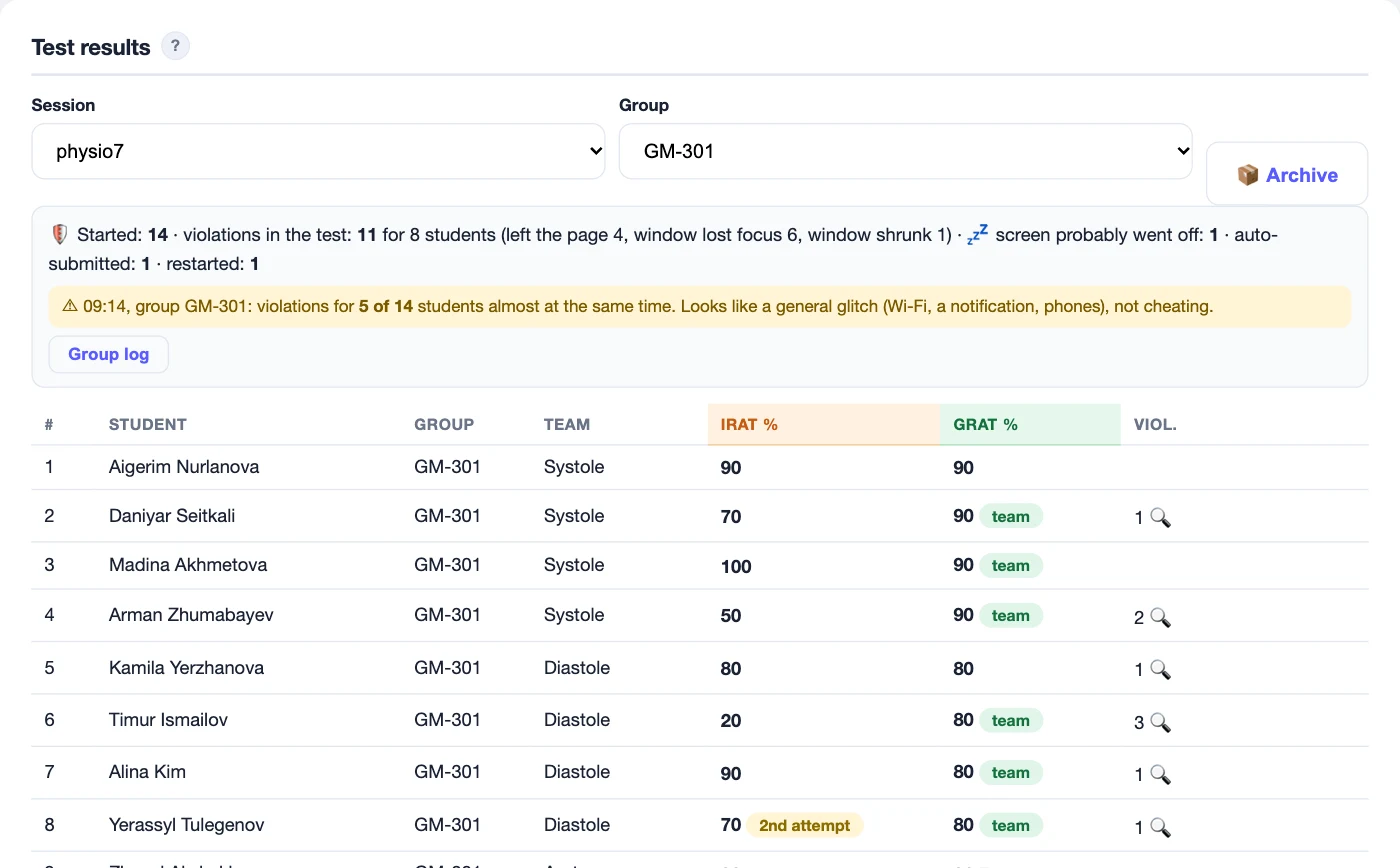
Student log
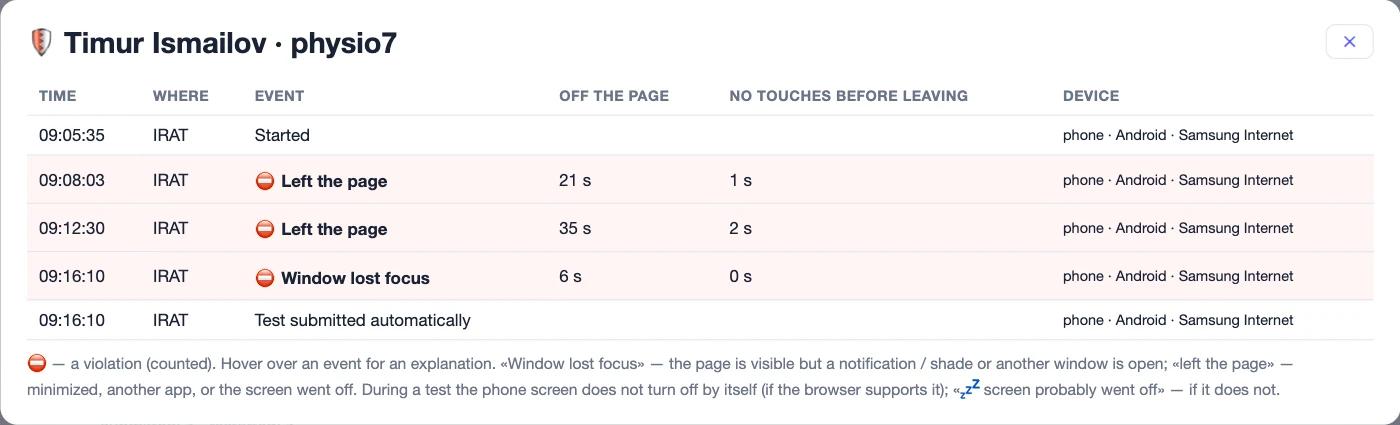
How to read this example:
- 09:05 — «Started»: the student opened IRAT on a phone. Not a violation.
- 09:08 — ⛔ «Left the page», 21 s: minimized the browser or opened another app. They had not touched the screen for 1 s before leaving — they left right away; the screen did not go dark by itself. 1st violation — a warning only.
- 09:12 — ⛔ «Left the page», 35 s: 2nd violation — minus 1 point.
- 09:16 — ⛔ «Window lost focus», 6 s: the notification shade or another window. 3rd violation.
- 09:16 — «Test submitted automatically»: after the 3rd violation the test is submitted by itself; in IRAT the score is halved. To the student it looks like «the test closed».
Columns
| Column | Meaning |
|---|---|
| Time | when it happened |
| Where | IRAT, GRAT or Essay |
| Event | with ⛔ on a pink background — a counted violation; without ⛔ — information (started, continued after a glitch) |
| Off the page | how long the student was away, if they came back. A dash — they did not come back (for example, the essay is already disqualified) |
| No touches before leaving | how long the student had not touched the screen, mouse or keyboard before leaving. Long (15+ s) on a phone — the screen probably went dark by itself: «💤 screen probably went off» appears |
| Device | phone or computer, system and browser |
Events
| Event | Meaning |
|---|---|
| ⛔ Left the page | minimized the browser, opened another app, the screen went dark or was locked |
| ⛔ Window lost focus | the page is on screen, but the shade, a notification or (on a computer) another window is open |
| ⛔ Window shrunk | windows side by side or a split screen |
| ⛔ Text pasted | ready-made text was pasted into the essay |
| 💤 screen probably went off | left after 15+ seconds without touching, and the keep-screen-on lock did not work — more likely a glitch than cheating |
| Continued after a glitch | the page was reopened and the same attempt continued — not a penalty |
| Restarted (attempt no. 2) | the first attempt was not submitted — the student started a second one |
| Continued on another device | the same attempt continued on another device — after you pressed «Allow another device» |
| Another device — waiting for permission | the student tried to continue the test or start again on another device without your permission; the «Device» column shows which one |
| Another device allowed | you allowed one switch to another device |
| Test submitted automatically | after the 3rd violation |
Group log
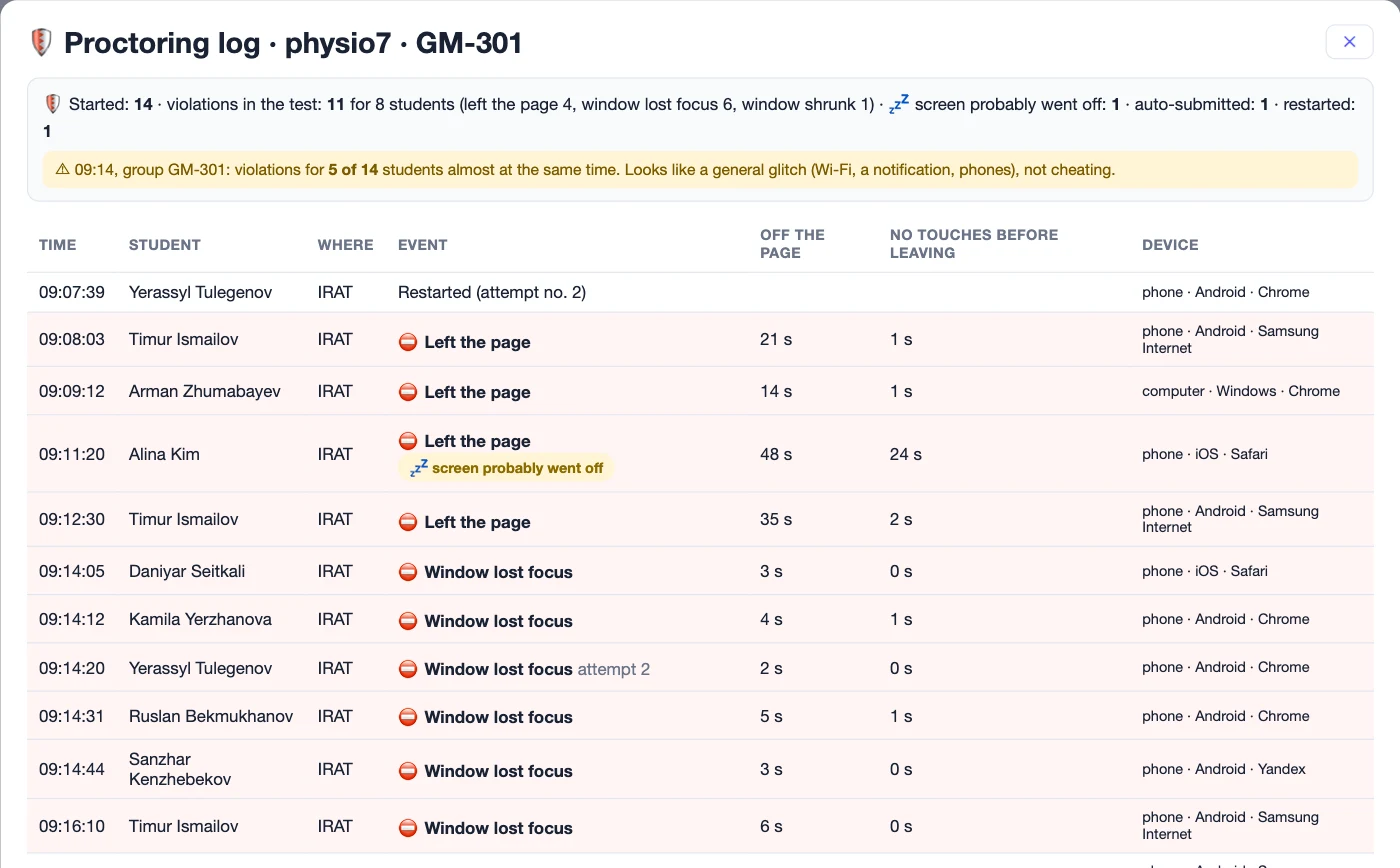
- At the top — a summary: how many students started, how many violations and for how many students, auto-submissions, disqualified essays.
- There are no «Started» rows here — only violations and glitches.
- The yellow «Looks like a general glitch…» note — violations for many students almost at the same time (Wi-Fi, a notification). This is not cheating: do not penalize; open a second attempt if needed.
Team tasks
Scores for team tasks.
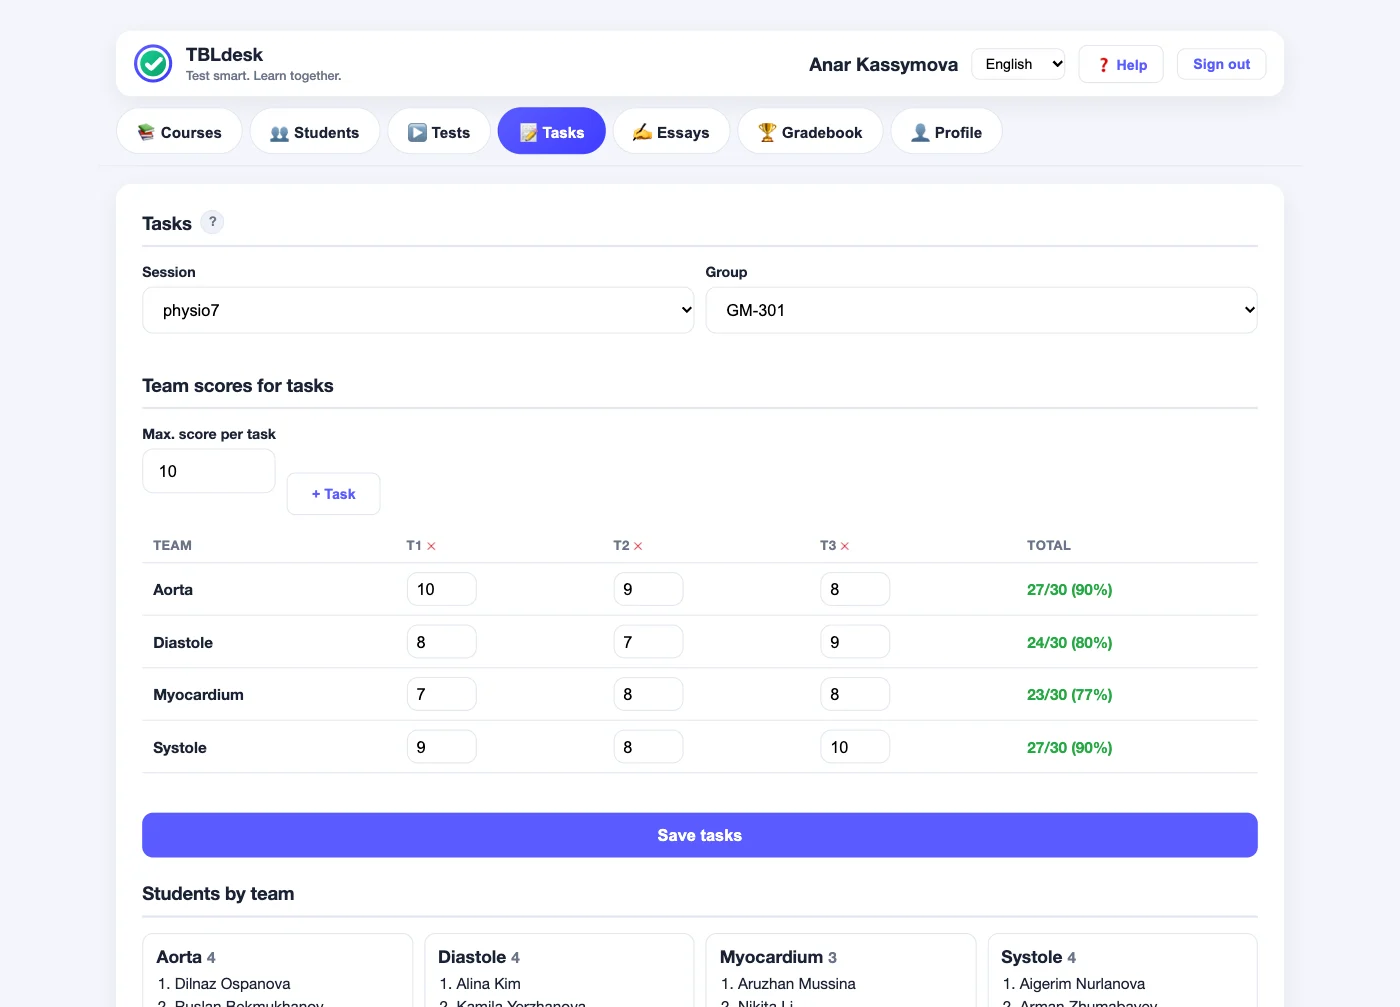
- Session, group, the maximum score per task (from 1 to 10).
- If needed, «+ Task» — up to 15 tasks.
- Enter the scores → «Save tasks» (the gradebook is recalculated).
- Below — names by team, so you can call on speakers from the same tab.
Essays
A short written assessment. Checking — by hand, or AI grades it and writes feedback. Strict proctoring: any violation means disqualification.
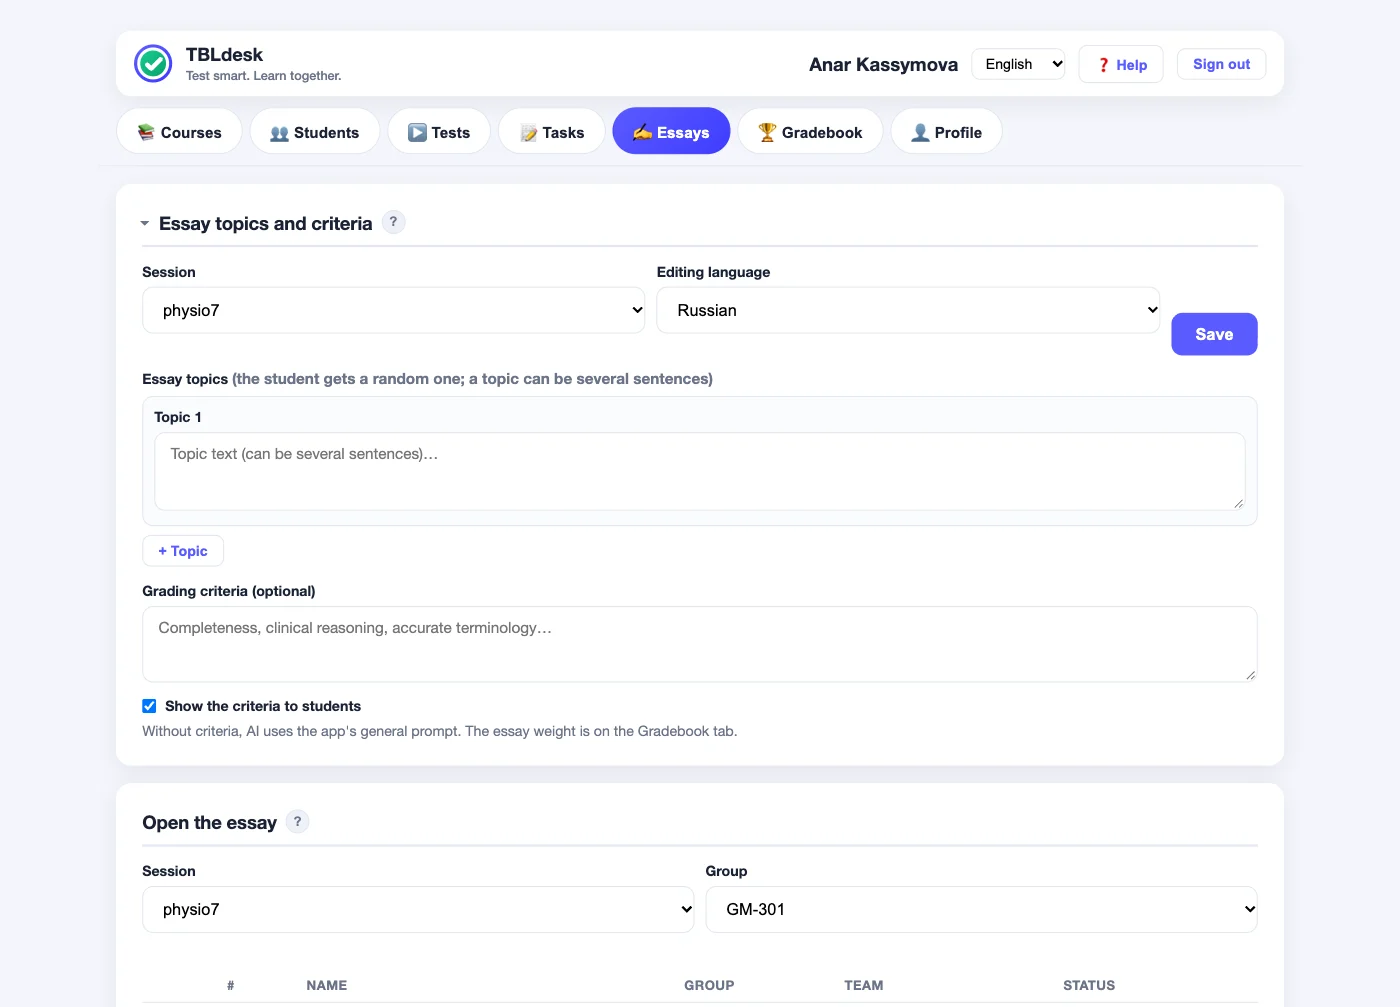
- Add topics (questions) and, if you like, criteria → «Save».
- Select students and open the essay.
- After submission: summary → name → AI check and/or manual edits. «Check with AI» first shows how many essays will be checked and how many checks will remain; the quota is charged only for a grade that was set. Disqualified essays and essays you have graded are not sent to AI — a disqualified one can be checked individually in the student's card.
- After changing grades — «Recalculate gradebook».
Gradebook
Stage weights, attendance and the final score. Students are in the same order as in your roster.
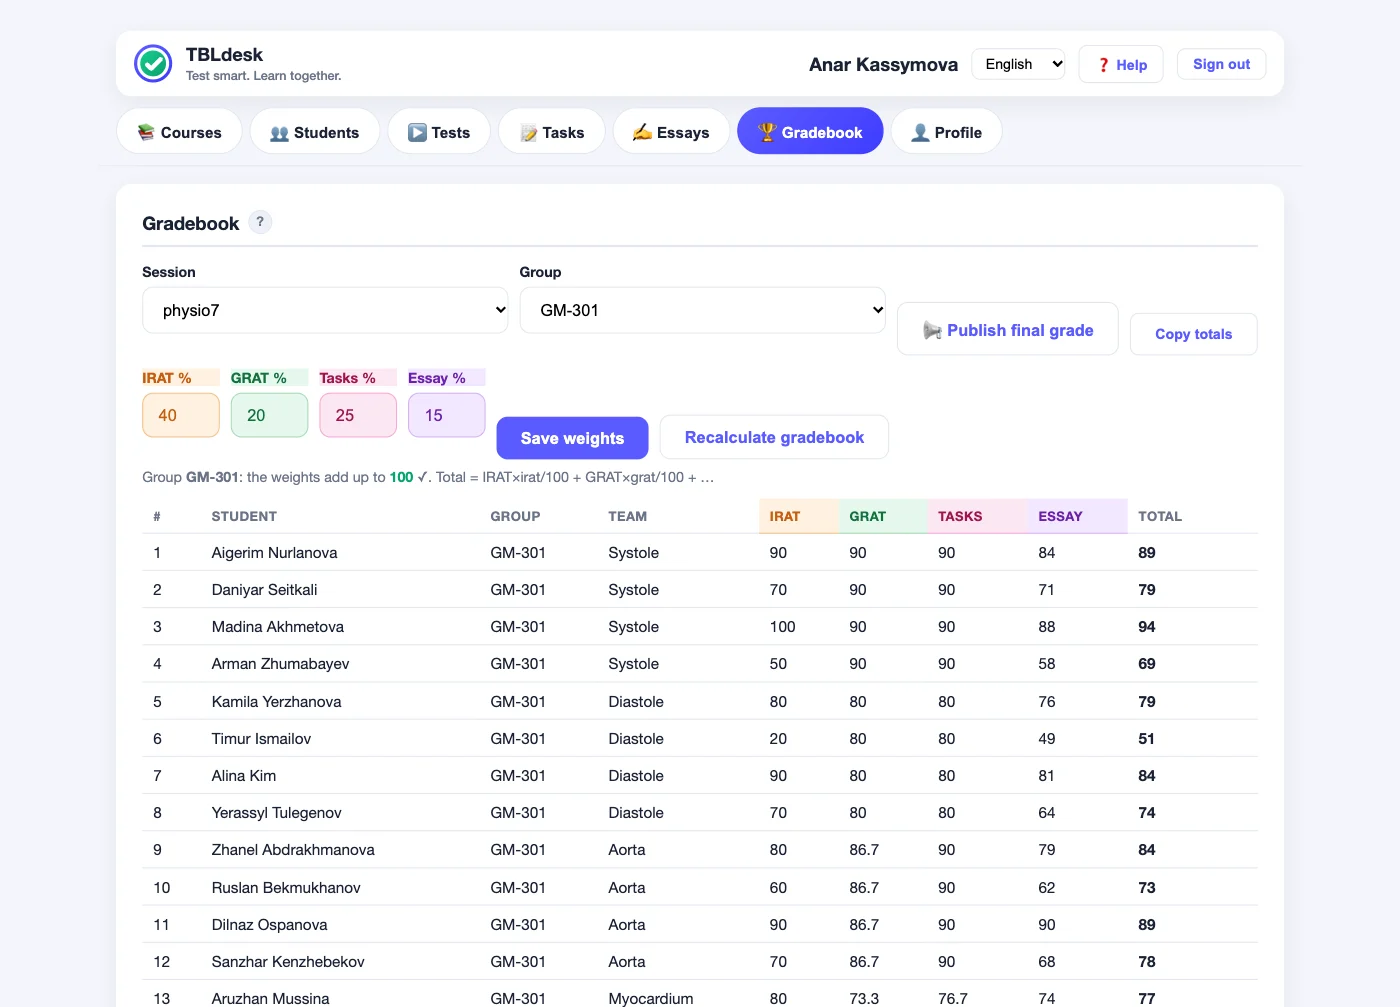
- Session and group.
- Weights — they must add up to exactly 100.
- Mark attendance if needed. For latecomers, set a penalty.
- «Save weights» and attendance only record the data.
- «Recalculate gradebook» — the total and the calculation.
- Copy the «Total» column to the department register.
- «Publish final grade» — so the student sees the grade in their portal.
A typical class (100 minutes): suggested timing
Check 5 minutes before class
- Session and questions are ready
- Teams are assigned
- Essay topics (if any)
- Weights = 100
- QR at hand
Profile and support
Better not to open it on the projector.
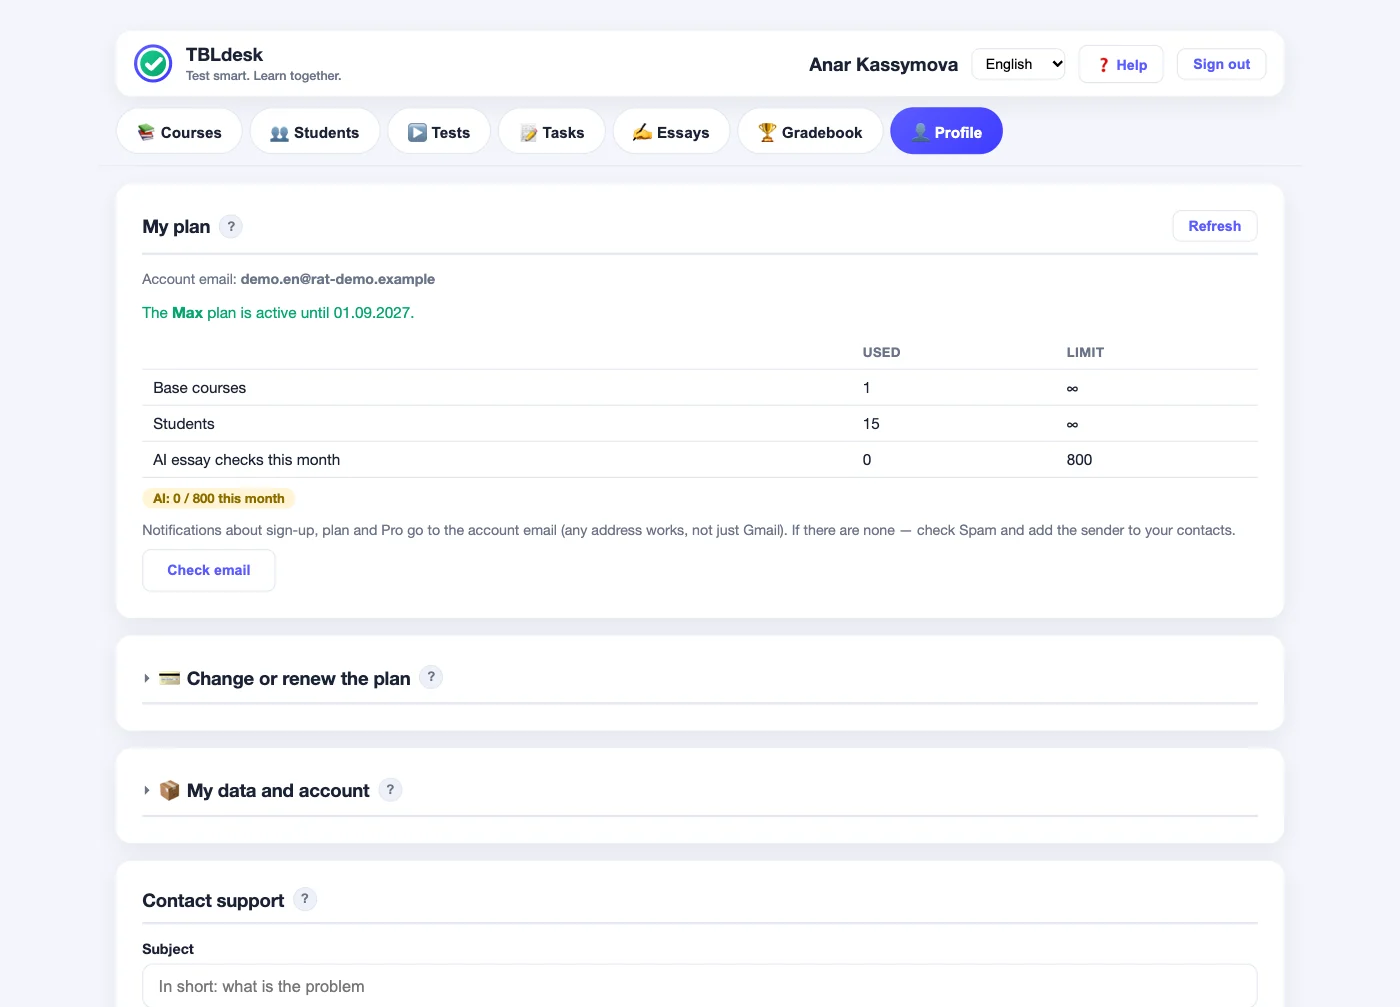
| Plan | Price | What you get |
|---|---|---|
| Free | 0 ₸ | 1 course, up to 30 students, 1 language; 30 AI essay checks per month during the first year |
| Pro | 3 500 ₸ / month | All courses and groups, 3 languages, 300 AI checks per month |
| Max | 7 000 ₸ / month | Everything in Pro, 800 AI checks per month |
| «+200» pack | 1 500 ₸ | +200 AI checks on top of the monthly ones; does not expire at the end of the month |
How to change or renew the plan
- The «Profile» tab → «Change or renew the plan».
- Choose Pro, Max or the «+200» pack and a period (1, 3, 6 or 12 months) — the amount is calculated for you → «Send request».
- The owner emails an invoice to the account address. After payment the plan switches on and you get an email.
Switching Pro ↔ Max takes effect at once: unused days are converted by price (2 Pro days = 1 Max day). Changed your mind — «Cancel request». After the period ends there are 7 days of grace; your data is not deleted.
Help before signing in: contact support.
Security rules
TBLdesk has no password: you sign in with Google or with an email code. Your account is protected by your device and, if you wish, a PIN.
Your own phone is the main device
- Sign up or sign in from your own phone — it becomes a remembered device.
- Turn on a PIN: «Profile» → «My data and account» → «Sign-in PIN», 4–6 digits.
- Now on any new device the dashboard asks for the PIN after Google or the emailed code. Your phone and your own laptop do not need it.
Shared computer (classroom, library)
- Work in an incognito window (Chrome: Ctrl + Shift + N, Mac: Cmd + Shift + N).
- When signing in with a PIN, untick «Remember this device».
- Press «Sign out» at the end. Do not show the dashboard on the projector — only the QR code.
Also
- Never share the emailed code: TBLdesk never asks for it by phone or in a messenger.
- 5 wrong PINs in a row lock sign-in for 15 minutes and send you an email. Got it but did not sign in — change the PIN on your phone and press «Sign out on other devices».
What students see
Students come in through the QR code or link from the «Tests» tab (the portal is tbl.edservice.kz/student). Below is what their portal looks like, so you can explain it briefly to the group in class.
Sign-in and registration
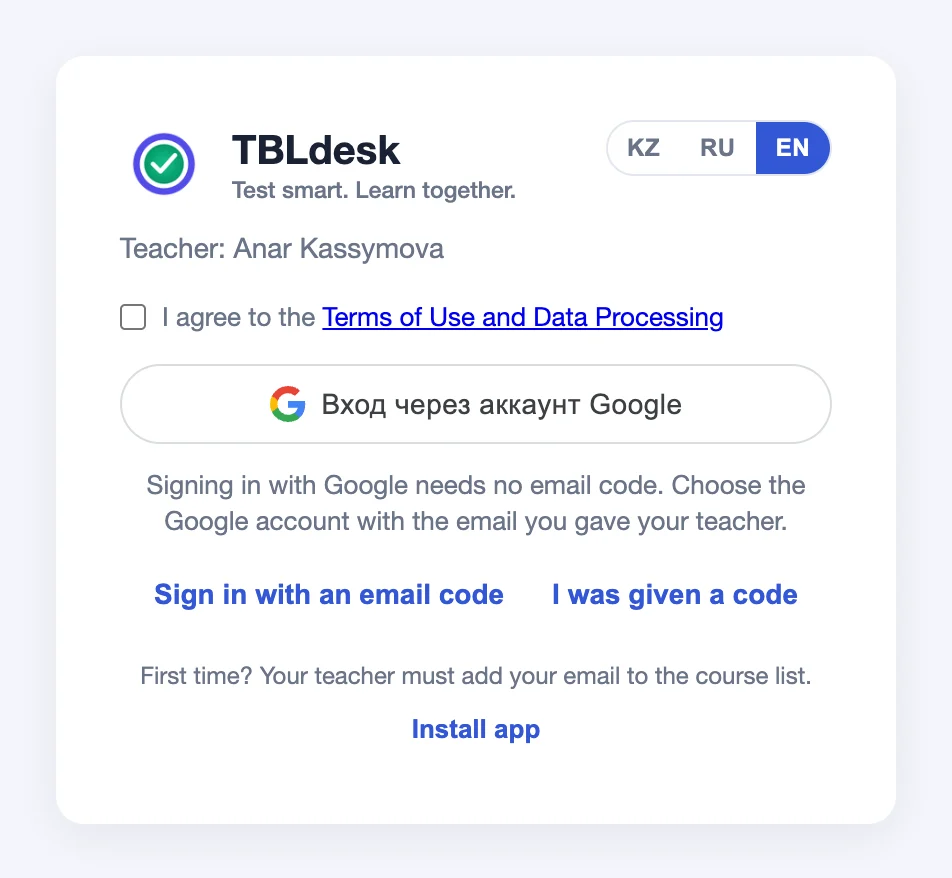
- The teacher's name is shown — the student lands exactly on your course.
- The email is the student's account, one for all courses. No PIN or password. Sign-in is kept on the phone for 30 days.
- Have students sign in in advance, in the first week, not all at once in class.
- The page can be added to the home screen — handier in class.
Switching courses
- If a student studies with several teachers, courses are switched with a button at the top: a window opens on the same page (the browser's pop-up blocker does not interfere).
- The current course is marked in the list. Without the right course, the test is «not visible».
- «Sign out» on the «Profile» tab ends the sign-in on this device.
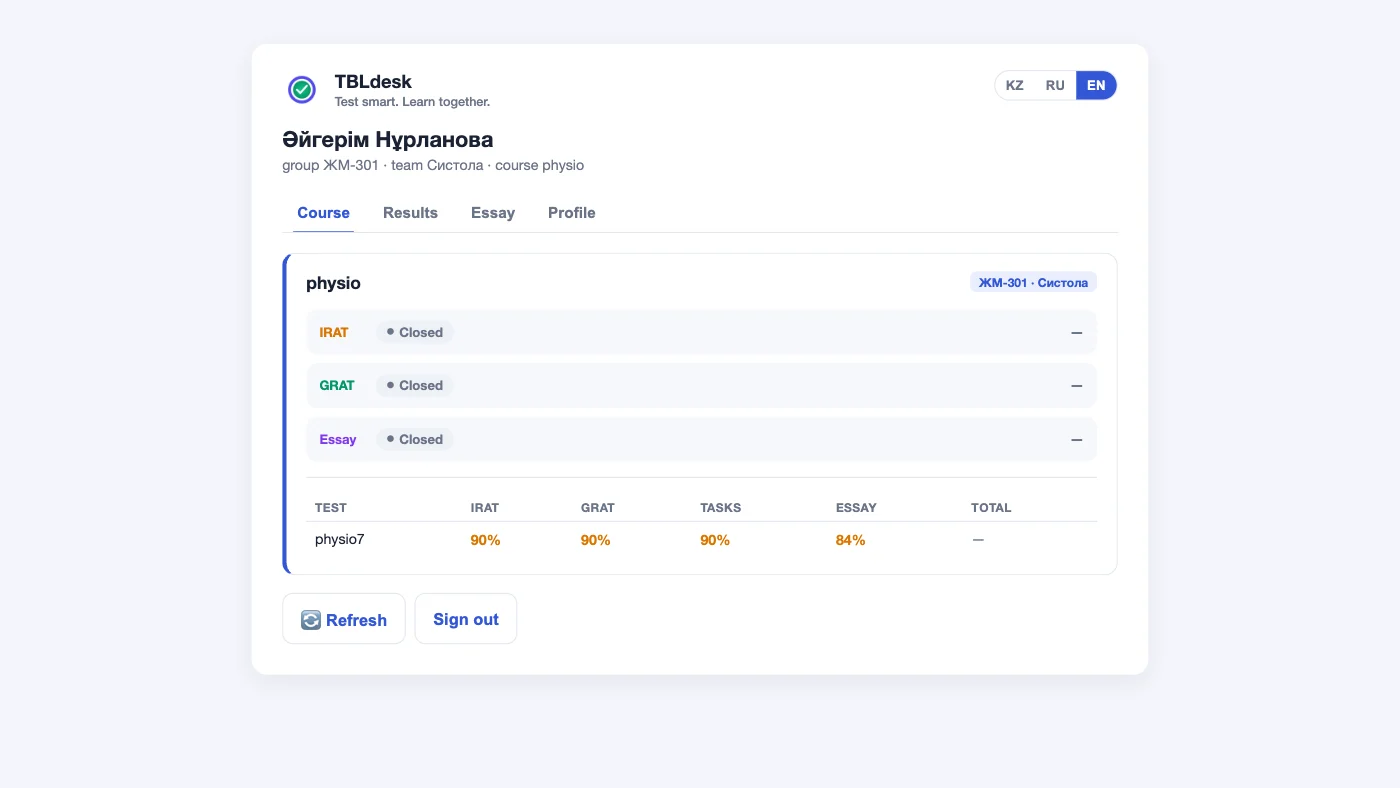
Course and class statuses
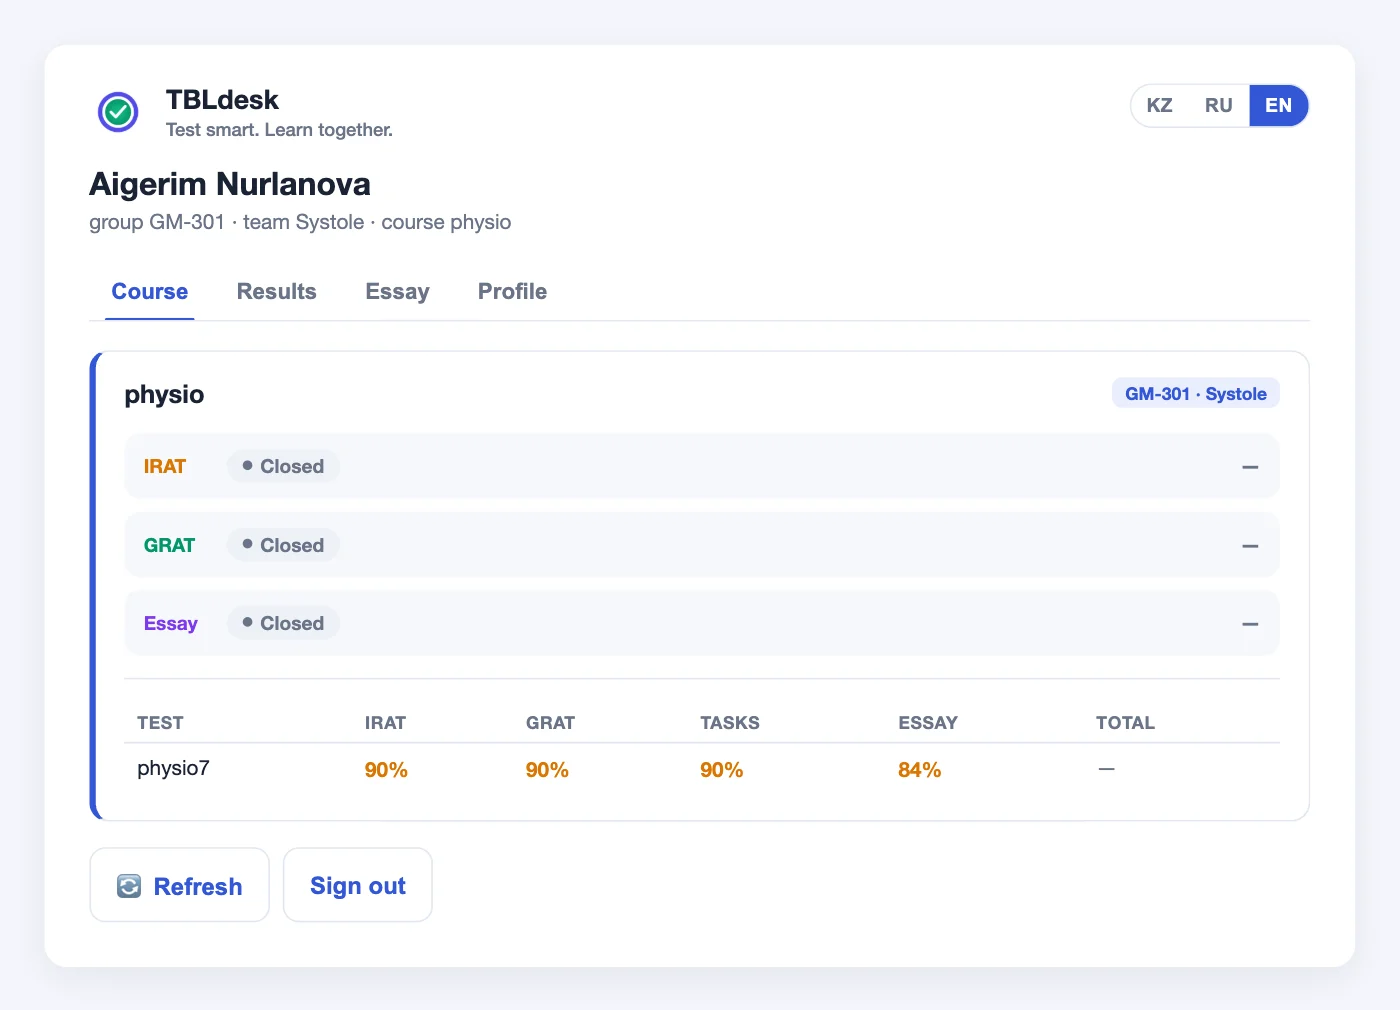
- When you open a test or essay, «Start» / «Continue» appears here.
- «Closed» means the class is no longer available.
- In the table, IRAT, GRAT, tasks and essays are visible right after submission. The total — only after «Publish final grade».
Results
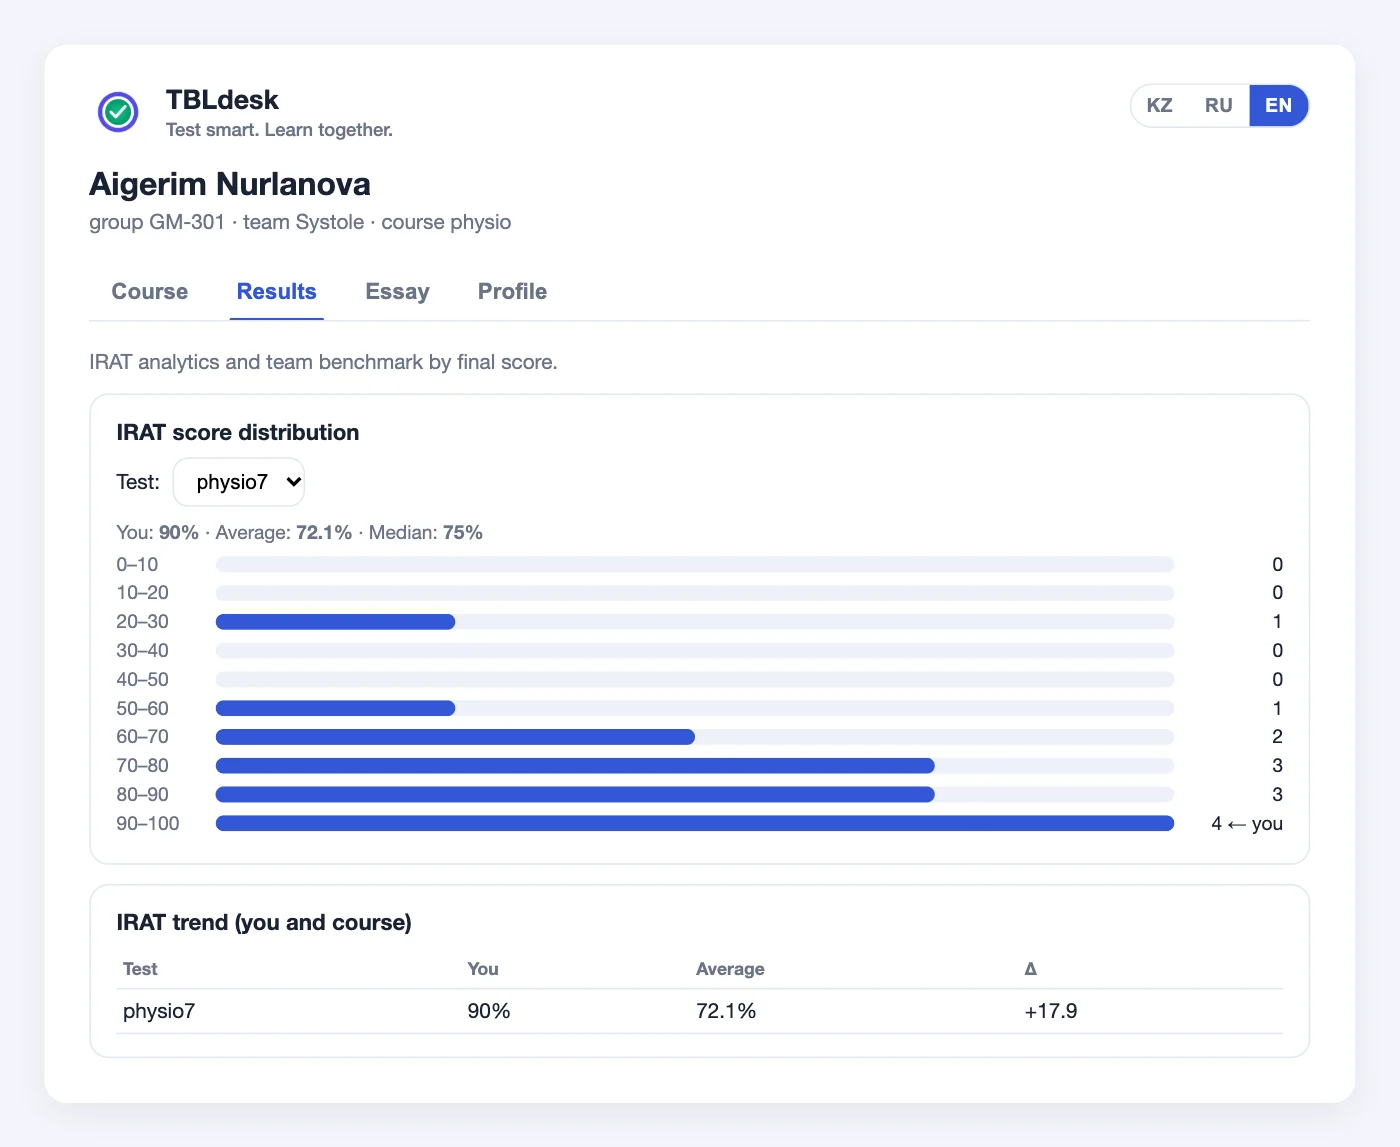
- The student sees their IRAT next to the course average and the difference (Δ).
- Below — a ranking of teams by final score (team names, no group number).
Essays for the student
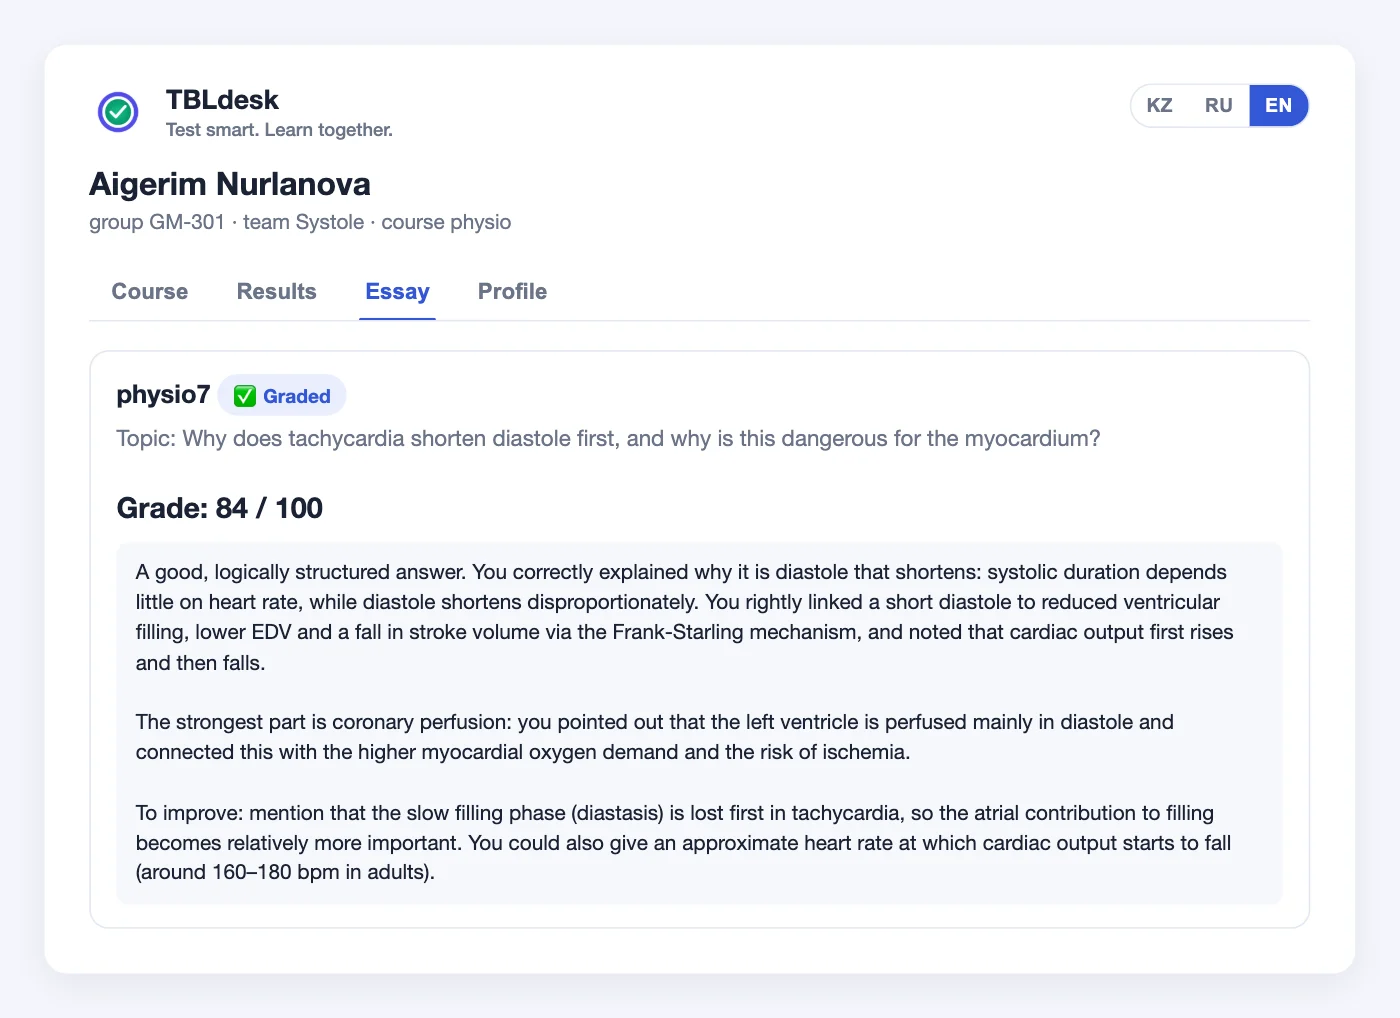
- One topic per attempt. After submitting — «being checked» or «Graded».
- «Disqualification» — proctoring recorded leaving the tab/window; the answer text is still saved.
- With repeated submissions, the best grade goes to the gradebook.
Frequently asked questions
Where is the teacher dashboard?
The «Dashboard» button at the top of the website leads to the sign-in page: tbl.edservice.kz/teacher. Bookmark it or add it to your home screen.
How do I sign in?
There is no password. On the sign-in screen press «Sign in with Google» or enter your email and the code from the email sent by rat@edservice.kz (check Spam). You stay signed in on this device for 30 days.
Where is the data stored?
On a server in Kazakhstan, with a backup every day. You can download all your data to Excel and delete the account: «Profile» → «My data and account». The same place has «Sign out on other devices», if you forgot to sign out on a shared computer.
Where do students sign in?
They have their own portal — tbl.edservice.kz/student; your course opens through the QR code on the «Tests» tab. There is also a link you can send via a messenger. The student signs in with Google (the Gmail on your list) or with an email code.
How do the plans differ?
Free — one base course, up to 30 students, one language, 30 AI essay checks per month during the first year; unlimited sessions and manually checked essays. Pro (3 500 ₸) and Max (7 000 ₸) remove the course and student limits and give three languages and 300 / 800 AI checks per month. Ran out of checks — the «+200» pack for 1 500 ₸. Changing the plan — «Profile» → «Change or renew the plan».
A student cannot sign in
Compare the email: click the student's name on the «Students» tab and compare it with the email on their phone (similar Gmail addresses are different accounts). If the code email does not arrive, use «Sign-in code» there: show the code on your screen, the student presses «I was given a code».
Questions will not import
In the dashboard: text → «Format» → «Import». Format:
1. Question....
A) answer 1
B) answer 2
C) answer 3
*D) key
Image and timer — in the «Question editor» block (click the question). If the format is right but there is an error, write to support.
The internet dropped during a test or essay
Answers are saved. The student opens the test again and presses «Continue» (IRAT within 20 minutes of the start, GRAT within 5 minutes); the essay draft is restored after signing in again. Follow the instructions on the screen.
A student was disqualified during the essay
Proctoring recorded a violation. The text written so far is saved — you can grade it by hand or check it with AI individually in the student's card. With repeated submissions, the best grade goes to the gradebook. Keep to the deadline and watch for abuse.
I deleted a student, session, questions or results by mistake
Write to support right away — the «Profile» tab in the dashboard or the «Support» button on tbl.edservice.kz.
Common problems
| Problem | What to do |
|---|---|
| Cannot see the test | Is the test open? The right course at the top? The same teacher link? The name in the roster? |
| No «Continue» | The window has passed, 2 attempts are used, or the test is closed |
| Empty total | Absent or no email — «Recalculate» |
| Questions will not import | Check the format: «1. Question», «A) …», key *B) …. The format is right but there is an error — write to support |
| The code did not arrive | Spam and the address → wait a minute → «Send the code again». For a student — «Sign-in code» in the roster; at the limit — support |
| «Too many…» when signing in | Wait (the message says how long). Students are better off with the Google button — it does not use codes |
| Free plan limit (course, 30 students, language, AI checks) | «Profile» → the Pro / Max plan or the «+200» pack |
| «Connection error» for everyone | A server failure: wait a few minutes — the essay text is saved on the student’s phone. Tell the owner |
| The student cannot sign in with Google | The wrong Gmail was chosen — click the name in the roster and compare the email with the student's phone |
The full list of student and panel messages, their causes and what to do is in the dashboard: «❓ Help» → «Errors and limits». You can paste the error text from a student’s complaint there.
What to avoid
- Reloading the dashboard during class without need.
- Archiving results before copying the gradebook.
- Opening «Profile» on the projector.
- Marking «absent» after saving the gradebook — they will still be given team points.